Showing posts with label imperial guard. Show all posts

Tuesday, 13 December 2011

WH40K: Maxmini Siege Guns - mostly painted

Here are the Siege Guns with most of the painting done.


I usually paint track pieces separately. I put them on double sided tape on a bit of board. I spray with Citadel Black and then Tamiya or Mr Colour Gunmetal. 


The vehicles are undercoated in Citadel Black, then Tamiya Light Sand. The tracks get glued on, then I go over them with paint markers for weathering. Silver paint marker for wear and tear, and various mud and dust colours for dirt. It's not precise, and it won't win any modelling prizes, but it's good enough for the table top. 


When I was building these kits, I accidentally dropped one of the guns, breaking the resin in a couple of places. Luckily I found a couple of the small fragments and glued them back on. Superglue (cyanoacrylate) adheres to resin very quickly, which is tricky if you are trying to adjust the placement of pieces on a model, but it is a very strong bond. Once painted, the join is hardly visible. I couldn't be bothered repairing the handle on the breech, because I expected it would just break off again during game play. 


WH40K: Maxmini Siege Guns

Maxmini are a Polish company making good quality resin figures, weapons and parts for conversions, for fantasy and science fiction wargames. Coincidentally, some of their parts fit neatly to Games Workshop's line of Warhammer 40,000 toy soldiers and models.

Their Siege Guns really caught my eye. They would be lovely substitutes for Medusa self propelled guns, but with your opponent's permission they could also be substituted for Colossus or Bombard mortars.
Picture of assembled Siege Gun with sandbag scenery, from the Maxmini website.
There is a nice review of the gun, showing the components, at the Bell Of Lost Souls website.

The guns and other bits are nicely moulded. There was a little flash, but hardly any airbubbles. When mine were delivered, they were missing the little wheeled ammunition loaders, but the guys at Maxmini were very apologetic and immediately sent replacements. Thanks guys, great work!

The guns are about the size of the GW Basilisk pieces, with much shorter barrels.

The models come with sandbag emplacements (three pieces of resin) which have been temporarily placed in the Terrain bits box. I assembled the guns and superglued them into the Chimera chassis, with a few extra bits such as ammo boxes, backpacks and communicator parts from the bits box.

This is what they look like attached to GW Chimera models:


(Apologies for the mobile phone photos; the next ones will be better. Promise!)

Saturday, 27 September 2008

WH40K: Imperial Guard Armour

I have mentioned a couple of times the various combinations of vehicles and weapons that evolved from Project: Bull Grox and Project: Tank With Too Many Guns. (The Baneblade Recovery Vehicle and the Stormhammer, respectively.)

Here are the Leman Russ variants that I made to escort those beasts:


Leman Russ Vanquisher. This is a plastic Leman Russ, with a plastic Baneblade battlecannon.

Leman Russ Vanquisher - Commissar version. Same as the above, but with a mount for devotional readings on the turret and the Aquila plate on the rear deck to inspire the troops following (and protect the Commissar's supply of Tanna brew gear. Crucial for morale.)

Leman Russ Demolisher - built from the box. Originally I had plans to use the Demolisher gun on the Bull Grox but it looked a bit small for the larger tank.


Chimera Manticore - Self Propelled Anti-aircraft Artillery (SPAA). Convertible into a Chimera Tracked Load Carrier (TLC or Tilly). The SPAA is useful in Apocalypse games - but keep it protected because it has very low armour. The Tilly is good as an objective or just scenery. The missile launcher is of course from the Space Marine Whirlwind - but with extra bits added. In fact the large missile mounts are glued on to the small missile mounts to give the launcher extra length. I added plates to the launcher box to make it more IG and less Space Marine. Also, half way through building it I realised that there were no hatches for the crew, so there is now a big door in the back.

Friday, 19 September 2008

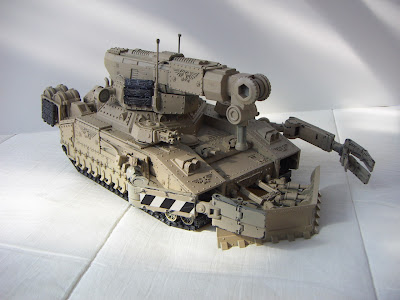
WH40K - Bull Grox nearly complete


The Bull Grox - or Baneblade Recovery Vehicle - is nearly complete. I added the manipulator arms - they are pretty much straight out of the WALL-E toy, with a few nuts and bolts added from the tank-traps in the GW scenery kit. (The one with the oil drums and ammo boxes).

I undercoated in Citadel Black and sprayed over that with Tamiya Deck Tan. The strips were already painted on the yellow plastic WALL-E arms, so I just masked with a strip of Tamiya Masking Tape to keep a section of diagonal 'danger stripes'.